Freelance
Web designer
Front-end web developer.
info@madeinpego.it
Come configurare i widget in base alla lingua tramite il plugin Polylang free
Come configurare i widget (inclusi quelli del footer) per funzionare in base alla lingua tramite il plugin gratuito Polylang WordPress? Istruzioni passo-passo.
Il problema con Polylang gratuito è che non puoi impostare le versioni linguistiche per i widget (a parte i “widget legacy”), sia nella barra laterale che nel footer. Questo può essere un problema se desideri mostrare widget/testo/immagini della barra laterale o del footer diversi per lingue diverse.
1. Crea e utilizza un tema child
È sempre una buona idea creare un tema figlio, indipendentemente dalle modifiche.
Con un tema child ogni modifica che verrà apportata non sarà eliminata al primo aggiornamento del tema “padre”.
2. Scopri i codici delle tue lingue
Per ogni versione linguistica, c’è un “codice” Polylang corrispondente. Devi vedere cosa usa il tuo sito. Ecco come scoprirlo:

3. Aggiungi codice personalizzato per Polylang
Aggiungi questo al file functions.php del tuo tema figlio
// BEGIN language class edit

// Add language class to body tag
function add_language_class_to_body( $classes ) {
    // Get current language from Polylang
    $current_language = pll_current_language();

    // Add the current language to the body classes
    if ( $current_language ) {
        $classes[] = $current_language;
    }

    return $classes;
}
add_filter( 'body_class', 'add_language_class_to_body' );

// END language class edit
Aggiungi questo al file style.css del tema figlio (io ho usato “it” per l’italiano e “en” per l’inglese):
/* BEGIN language class edit */

/* Hide the widget with class 'widget-it' when the page's language is set to English ('en' class is present on the body tag) */

body.en .widget-it {
    display: none;
}

/* Hide the widget with class 'widget-en' when the page's language is set to Italian ('it' class is present on the body tag) */

body.it .widget-en {
    display: none;
}

/* END language class edit */
4. Ora puoi usare l’opzione “Classi CSS aggiuntive” per definire come e quando vuoi che i widget vengano visualizzati:
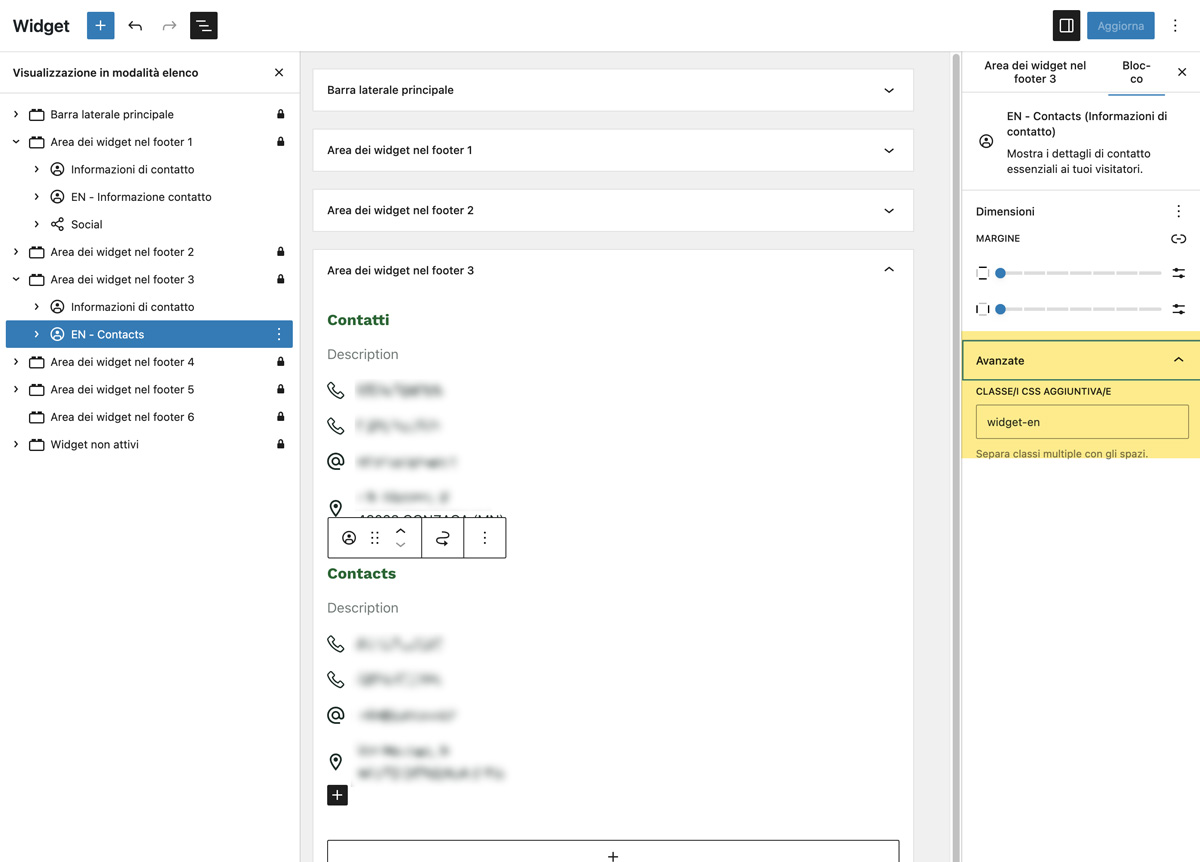
Aggiunta del mio codice di lingua personalizzato a un widget (“widget-it” è per l’italiano e “widget-en” per l’inglese come nel mio codice CSS personalizzato)
Buon lavoro!
> Scarica POLYLANG Free plugin